Cut costs in half by right-sizing AWS EC2 instances


Rule forty-two: All persons more than a mile high must leave the court.
– The King of Hearts, Alice’s Adventures in Wonderland by Lewis Carroll
The concept of “right sizing” has been part of storytelling lore for generations. In Lewis Carroll’s “Alice in Wonderland,” Alice consumes various goodies that make her grow or shrink to adapt to her adventures. In “The Lord of the Rings,” the one ring to rule them all scales to fit its bearer perfectly, from a fearsome king to a humble hobbit. The tale of Cinderella hinges on a glass slipper being just her size, enabling the Prince to identify her as his enchanting and incognita guest at the Royal Ball.

Alice in the Server Room, made with the Midjourney Generative Art AI
These stories and more revolve around right-sizing an object to its rightful bearer. In the AWS-verse, a land just as sprawling as Middle Earth, we AWS customers are the rightful bearers and EC2 instances should be resized to fit our needs. Although a properly sized EC2 instance may not help us navigate Wonderland or marry into royalty, it will deliver substantial AWS savings – which is almost as good.
Table of Contents
- Oversized EC2 instances: they happen to the best of us
- How much can you save by right-sizing EC2 instances?
- A brief overview of AWS Compute Optimizer
- How to manually right-size EC2 instances with AWS Compute Optimizer
- Right-size EC2 instances easily, continuously, and automatically with CloudFix
Oversized EC2 instances: They happen to the best of us
We’ve all been there: Our application is racking up thousands of requests per minute and we’re limited only by the amount of compute power available to us. Then things change. Services become less busy, or we push new code updates to our application to make it more efficient. Boom: oversized EC2 instances.
Teams frequently overprovision when migrating applications to AWS as well. Developers tend to request as much infrastructure as they can, especially if they’re unfamiliar with the cloud. This isn’t to be deliberately wasteful; they often come from environments with a “use it or lose it” accounting policy, which ends up encouraging overspending. When you combine this mindset with a lack of monitoring and optimization, you end up with EC2 instances that are oversized relative to their environment.
How much can you save by right-sizing EC2 instances?
Some of our fixers find small savings that add up at scale, like last week’s duplicate AWS CloudTrail trails. Not this one. When it comes to EC2, even right-sizing one instance can deliver substantial savings – and doing it continuously, at scale, can cut your costs by half or more, ad infinitum.
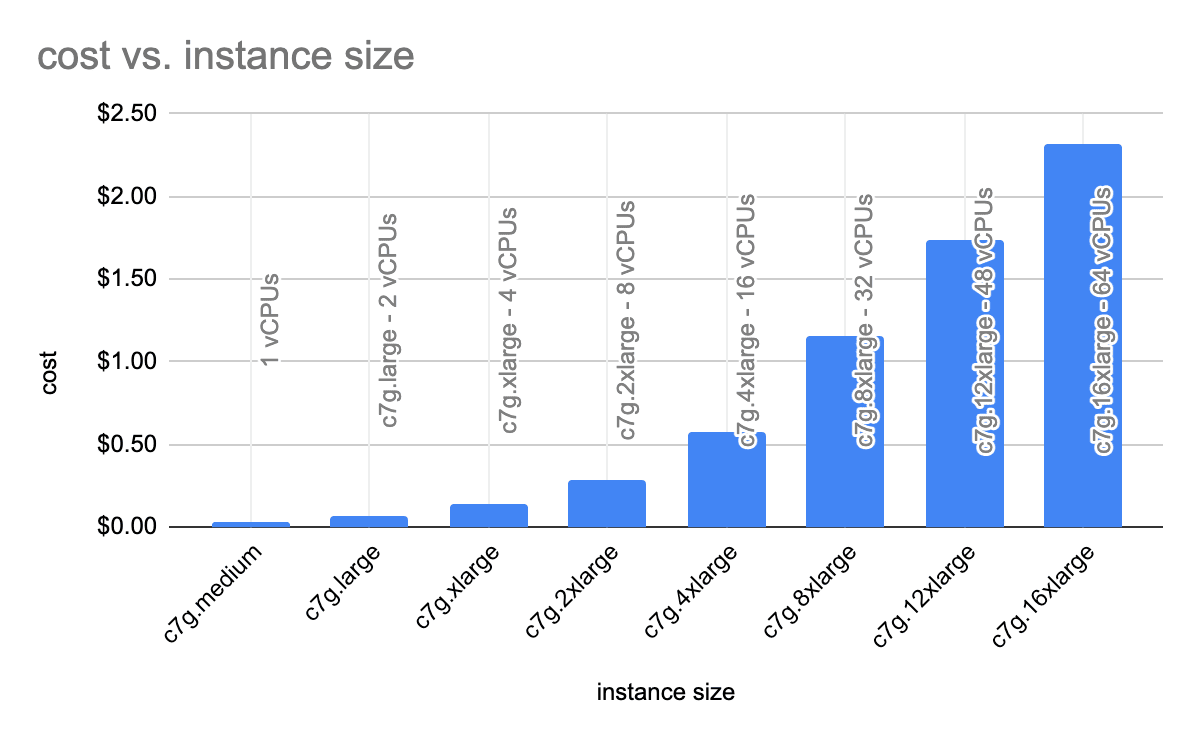
Take, for example, one of our favorite instance types: the Graviton3-based c7g instance. The instance sizes range from the c7g.medium with one vCPU to the c7g.16xlarge with 64 vCPUs. For the c7g, instances are offered in 1, 2, 4, 8, 12, or 16 vCPUs. Plotting the vCPUs vs. price, we can see how the cost jumps as the instance size gets larger. The jump from a 12xlarge to a 16xlarge, for instance, costs an additional $0.58/hour. That is a huge difference between sizes in very real dollars.
Costs vary even more in the m-series of EC2 instances due to the wider selection of available sizes. The cheapest of the m6a series is the m6a.large at $0.0864/hr for two vCPUs, all the way up to a m6a.48xlarge for $8.2944/hr for 192 vCPUs. That is a 96-fold price increase between the smallest and largest instances for a given instance type.
How much you can save by right-sizing EC2 instances depends on how many unoptimized EC2 instances you have running. One large CloudFix customer saved 17% on EC2 by automatically right-sizing their instances. That amount is impressive regardless, but even more so because the company had already gone through several other optimizations and consolidations. EC2 is one of the largest cost drivers for most AWS accounts. We’re going to go big here and estimate that for many businesses, the savings could be even higher.
A brief overview of AWS Compute Optimizer
At the highest level, manually right-sizing EC2 instances involves using AWS Compute Optimizer to find opportunities for optimization, implementing those recommendations, and then monitoring your instances to make sure all is well and good.
Let’s start with an overview of AWS Compute Optimizer, since that’s the backbone of this process. AWS Compute Optimizer is, conveniently, a right-sizing service. It provides suggestions for how to optimally utilize EC2, EBS, ECS, and Lambda. Compute Optimizer looks at metrics about system utilization for these resources and, once enough data has been collected, produces right-sizing recommendations.
For EC2, Compute Optimizer uses CPU, memory, network, storage I/O, and other data points to analyze long-running instances and provide a set of options for reducing EC2 spend. These recommendations are intended to reduce the amount of excess capacity while still providing adequate resource “headroom” in case the load increases.
A smaller instance means less spend but also less headroom, which increases the risk that if the load increases outside of historical norms, the instance will be unable to keep up. Conversely, a larger instance offers more headroom, but is also more expensive, with less realized savings. This idea is captured in the “Risk” metric in the chart below. (Spoiler alert: we’re all about low and very low risk changes. That’s just how we roll.)
AWS presented a great example of this at re:Invent 2021’s Compute Optimizer breakout session. Say you had a long-running m5.2xlarge instance. These instances have 8 vCPUs and 32 GiBs of RAM. This hypothetical instance is showing 40% CPU utilization during the day, 10% CPU utilization at night, 30% RAM usage, < 1 Mbps of network usage 99% of the time, and < 2 IOPS more than 99% of the time.
Here’s what AWS Compute Optimizer recommends:
|
Option# |
Instance Type |
vCPU |
RAM |
Network |
Monthly $ |
Savings |
Risk |
|
Original |
M5.2xlarge |
8 |
16 GiB |
10 Gbps |
$280.32 |
N/A |
N/A |
|
Option 1 |
M5.xlarge |
4 |
16 GiB |
10 Gbps |
$140.16 |
50% |
Low |
|
Option 2 |
T3.xlarge |
4 |
16 GiB |
Moderate |
$121.47 |
56.70% |
Medium |
|
Option 3 |
R5.large |
2 |
16 GiB |
10 Gbps |
$92.98 |
67.20% |
Medium |
Let’s break this down.
First, note that recommendations can happen across instance families. Next, see that the various options differ in the amount of savings and risk. Also, the savings are substantial; 50% savings for a low-risk change. That’s what we like to see.
Before we get into implementing these recommendations, a quick pro tip: adjust the look-back period in Compute Optimizer. By default, Compute Optimizer makes recommendations based on a 14-day window, but 14 days does not history make. For instances that surge on a monthly or quarterly basis, we like a 90-day window. Much better context.
Fortunately, AWS lets us make that change with Enhanced Infrastructure Metrics. Announced in a Nov 2021 blog post, Enhanced Infrastructure Metrics is a paid feature that increases the look-back period to 93 days. As of Apr 2023, it costs $0.0003360215 per resource per hour, which we’ve found to be well worth it.
Compute Optimizer is an AWS Regional Service that’s not available in all regions. As of April 2023, the supported regions for this service are:
- Africa: Africa (Cape Town),
- Asia Pacific: Asia Pacific (Hong Kong), Asia Pacific (Tokyo), Asia Pacific (Seoul), Asia Pacific (Osaka), Asia Pacific (Mumbai), Asia Pacific (Singapore), Asia Pacific (Sydney)
- Canada: Canada (Central)
- China: China (Beijing), China (Ningxia)
- Europe: Europe (Frankfurt), Europe (Stockholm), Europe (Milan), Europe (Ireland), Europe (London), Europe (Paris)
- Middle East: Middle East (Bahrain)
- South America: South America (Sao Paulo)
- USA: US East (N. Virginia), US East (Ohio), AWS GovCloud (US-East), AWS GovCloud (US-West), US West (Northern California), US West (Oregon)
How to manually right-size EC2 instances with AWS Compute Optimizer
We’ve seen how AWS Compute Optimizer works in general. Now, how can we use it to right-size our specific EC2 instances?
Manually right-sizing EC2 instances with Compute Optimizer involves five steps. (You could also do it with just a few clicks in CloudFix. If that’s more up your alley, feel free to skip to the end.)
- Enable AWS Compute Optimizer
- Enable Enhanced Infrastructure Metrics for Compute Optimizer
- Query Compute Optimizer for instance recommendations
- Implement the Recommendations
- Monitor your instances
Step 1: Enable AWS Compute Optimizer
The first step to right-sizing your EC2 instances is enabling AWS Compute Optimizer. This is pretty straightforward, as you can see in the Getting started with AWS Compute Optimizer guide. To summarize, visit the Compute Optimizer console within the AWS Management Console, click on “Get started,” and work through the “Setting up your account” page. The only decision is how to deal with organization accounts. If you are logged into a management account, you have the option to enable Compute Optimizer for “Only this account” or “All accounts within this organization.” We recommend the latter option – the more savings, the better!
You can also opt in by using the AWS CLI. We prefer this method because it’s faster and it’s scriptable across a set of accounts. The command for doing this as an individual or member account is:
aws compute-optimizer update-enrollment-status --status ActiveRunning this command will return a simple acknowledgement:
{
  "status": "Active"
}
To enable Compute Optimizer for accounts in an organization, use this command:
aws organizations enable-aws-service-access \
    --service-principal compute-optimizer.amazonaws.com
Once you have opted in, you need to wait up to 24 hours before receiving recommendations. It takes time to gather the metrics and perform the analysis.
Step 2: Enable Enhanced Infrastructure Metrics for Compute Optimizer
As we mentioned in our pro tip above, you want to opt into Enhanced Infrastructure Metrics for Compute Optimizer to extend the lookback period to 93 days. The Enhanced Infrastructure Metrics section of the Compute Optimizer documentation gives detailed instructions for how to enable this via the Management Console. The key details are that Enhanced Infrastructure Metrics can be activated at a resource, account, or organization level. If you are using AWS Organizations, the best plan is to enable this option for all organization accounts, for all EC2 instances. If you are using a standard account, enable this for all EC2 instances within that account.
Using the AWS CLI, we can use the put-recommendation-preferences command at an account level:
aws compute-optimizer put-recommendation-preferences   \
    -resource-type Ec2Instance                         \
    -scope "name=AccountId,value=<YOUR-ACCOUNT-VALUE>" \
    -enhanced-infrastructure-metrics Active
You can also enable Enhanced Infrastructure Metrics on each EC2 instance individually. This is usually not the best choice, but there may be special cases where it’s appropriate. For example, if there is a large set of EC2 instances that are statically sized and will never be resized, it may be better to opt in each set of instances. This, however, is a pretty edge case scenario that you’re unlikely to come across.
Step 3: Query Compute Optimizer for instance recommendations
Once AWS Compute Optimizer has been enabled and running for 24 hours, you can query it for recommendations. You can do this in a web-based dashboard accessible from the Management Console, but we’re going to focus on the AWS command line / API interface, since it facilitates the automation required to use Compute Optimizer regularly and at scale.
The command to get EC2 instance recommendations is aptly named get-ec2-instance-recommendations. This command takes as input a set of instance ARNs. The command in general looks like:
aws compute-optimizer get-ec2-instance-recommendations \
    --instance-arns <instance-arn>
For example, using a EC2 ARN:
aws compute-optimizer get-ec2-instance-recommendations \
    --instance-arns  \
    arn:aws:ec2:us-west-2:123456789012:instance/i-0abcdefgh1234567
This will produce a JSON output:
{
  "instanceRecommendations": [
    {
      "instanceArn": "arn:aws:ec2:us-west-2:123456789012:instance/i-0abcdefgh1234567",
      "instanceName": "my-instance",
      "currentInstanceType": "m5.2xlarge",
      "finding": "Overprovisioned",
      "utilizationMetrics": [
        {
          "name": "Cpu",
          "statistic": "Average",
          "value": 30.0
        },
        {
          "name": "Memory",
          "statistic": "Maximum",
          "value": 35.0
        }
      ],
      "lookBackPeriodInDays": 93.0,
      "recommendationOptions": [
        {
          "instanceType": "m5.xlarge",
          "projectedUtilizationMetrics": [
            {
              "name": "Cpu",
              "statistic": "Average",
              "value": 60.0
            },
            {
              "name": "Memory",
              "statistic": "Maximum",
              "value": 70.0
            }
          ],
          "performanceRisk": 0.1,
          "rank": 1,
          "savingsOpportunity": {
            "annualSavingsAmount": 1681.92,
            "annualSavingsPercentage": 50.0
          },
          "findingReasonCodes": [
            "CPUOverprovisioned",
            "MemoryOverprovisioned"
          ]
        },
        {
          "instanceType": "t3.xlarge",
          "projectedUtilizationMetrics": [
            {
              "name": "Cpu",
              "statistic": "Average",
              "value": 65.0
            },
            {
              "name": "Memory",
              "statistic": "Maximum",
              "value": 75.0
            }
          ],
          "performanceRisk": 1.5,
          "rank": 2,
          "savingsOpportunity": {
            "annualSavingsAmount": 1906.18,
            "annualSavingsPercentage": 56.6
          }
        },
        {
          "instanceType": "r5.large",
          "projectedUtilizationMetrics": [
            {
              "name": "Cpu",
              "statistic": "Average",
              "value": 80.0
            },
            {
              "name": "Memory",
              "statistic": "Maximum",
              "value": 85.0
            }
          ],
          "performanceRisk": 2.2,
          "rank": 3,
          "savingsOpportunity": {
            "annualSavingsAmount": 2260.08,
            "annualSavingsPercentage": 67.1
          }
        }
      ],
      "lastRefreshTimestamp": "2022-10-01T00:00:00Z"
    }
  ],
  "nextToken": "EXAMPLENEXTTOKEN"
}
This output is where the magic happens.
To start, we see that the finding is Overprovisioned. This means that the instance is too large. Compute Optimizer can also find instances that are too small, which will have a finding of Underprovisioned. You should probably investigate those too, but that’s a topic for another day.
Notice the utilizationMetrics. This shows why this instance is overprovisioned. We can see that Cpu usage and Memory utilization are at 30% and 35%, respectively. This means that the EC2 instance is oversized and can be right sized.
Next, look at the lookbackPeriodInDays field. It’s 93; that’s what we want to see. If this is set to 14.0, then you haven’t enabled Enhanced Infrastructure Metrics. Head back to Step Two.
Then Compute Optimizer gets into its recommendations, which are ranked according to risk level. The first recommendation is to switch to an m5.xlarge instance. This instance type has four vCPUs rather than eight, and 16 GiB of RAM rather than 32. The performance risk in this field is rated at 0.1. This goes back to our risk metric, which is evaluated on a scale from 0 to 4, with 0 being very low risk and 4 being high risk. In the Compute Optimizer Dashboard, it reports this as a text value: very low, low, medium, or high risk. In this case, the risk for transitioning to the m5.xlarge is rated at 0.1, which would be very low risk.
The output also tells us how much you would save with each recommendation. This is where it really gets good. The savingsOpportunity object shows the annual savings amount in real dollars, as well as the savings percentage, assuming that the instance runs continuously for a year. If you switched to m5.xlarge instance per the first recommendation, you would cut costs on that instance by 50%, a real cash value of $1681.92. Not too shabby.
Compute Optimizer gives us two other recommendations as well, for a t3.xlarge instance and an r5.large instance. You can see that as the risk increases, the savings opportunity also increases. This makes sense, as savings are created by eliminating excess capacity, but there is always some chance that the capacity will be needed in some unforeseen future scenario. As a result, with higher risk comes higher return.
Obviously the right recommendation for your team and organization will depend on your risk tolerance and savings objectives. At CloudFix, we stick with the very low or low risk savings opportunities (and we suggest that you do too.) Any medium or high risk recommendations with performanceRisk >= 2.0 are outside of our comfort zone.
Finally, note the findingReasonCodes array. This can have many values, as documented in the Instance Recommendation specification. We’re looking for recommendations that include CPUOverprovisioned and/or MemoryOverprovisioned, as these issues can be solved by shrinking the EC2 instance. Fixing other codes, such as NetworkBandwidthOverprovisioned, is a whole other ball of wax.
Step 4: Implement the Recommendations
You have your list of recommendations. Now how do you choose which ones (if any) to act on?
We use a fixed set of criteria to standardize and simplify this process. Here’s our approach:
- Exclude recommendations where the savings opportunity is < $100 per year. For these instances, any change at all is not worth the risk.
- Exclude recommendations that recommend nano or micro instance sizes. These instance sizes don’t have adequate headroom and any increase in load has a higher chance of failing.
- Exclude recommendations where the risk level is greater than or equal to 2. We’ve found that the majority of savings can be accomplished with very low or low risk, so it’s not worth running the riskier ones.
- Include only recommendations which have findingReasonCodes set to
CPUOverprovisionedand/orMemoryOverprovisioned.
If more than one recommendation passes this set of criteria, pick the one which has the greatest savings opportunity (duh. Wait, do we still say “duh”? 🤔) Now it’s time to actually change the instance type to right-size the EC2 instance.
Given the instance ID of an EC2 instance, we can change the instance type with this set of commands:
#!/bin/bash

# Set the instance ID
INSTANCE_ID=""

# Stop the instance
aws ec2 stop-instances --instance-ids $INSTANCE_ID

# Wait for the instance to be in a stopped state
aws ec2 wait instance-stopped --instance-ids $INSTANCE_ID

# Modify the instance type to t3.xlarge
aws ec2 modify-instance-attribute \
    --instance-id $INSTANCE_ID    \
    --instance-type "{\"Value\": \"t3.xlarge\"}"

# Start the instance again
aws ec2 start-instances --instance-ids $INSTANCE_ID
This set of commands will stop the instance type, change it, and start it again. Continuing with the example from above, we’re changing to the t3.xlarge instance type because it has the highest amount of savings where the performanceRisk is less than 2.
A quick note on scaling this process
Most companies, of course, have more than one EC2 instance. So what does this process look like across your entire fleet of instances?
Steps one and two, enabling Compute Optimizer and Enhanced Infrastructure Metrics, are things that you need to do once. That part is simple. Steps three and four, querying Compute Optimizer and taking action on the recommendations, are actions that should be automated and run regularly.
For example, this could be done using a Lambda function running with a scheduled event once every 24 hours. Remember, Lambda functions can run for a maximum of 15 minutes, so keep that in mind. One possible architecture for this process would be to have the scheduled Lambda function query Compute Optimizer, and then have it push resize jobs to an SQS queue. Then, have another Lambda function which reads from that queue and executes the resize. Then, any resize operations which do not succeed (this is rare, but can happen if all of the instances of a certain type get used in a given availability zone) can get processed by a Dead Letter Queue.
Step 5: Monitor your instances
Once you’ve changed the instance type, you want to keep an eye on the right-sized EC2 instances. There are two ways to do this:
- Use Compute Optimizer to see if the instance comes up as CPUUnderprovisioned or MemoryUnderprovisioned. The advantage of this is simplicity, but the disadvantage is that it takes at least 24 hours for an issue to be detected.
- Use CloudWatch alarms on CPU and memory utilization. This is the more complex option, but allows you to react more quickly to changes in resource utilization. CloudWatch can gather detailed real-time metrics on CPU, memory, and disk activity. To run this approach, of course, you need to have CloudWatch installed.
Meet Amazon CloudWatch
CloudWatch plays a key role in the ongoing optimization of EC2 instances (and in a number of CloudFix fixers). If you’re right-sizing them manually using the process above, it’s not strictly necessary, but it is a nice-to-have. If you’re optimizing EC2 automatically with CloudFix, you will need to install the AWS CloudWatch agent as a prerequisite.
What is CloudWatch? The CloudWatch agent is a small, open-source program from Amazon that runs on AWS-managed infrastructure like EC2 instances and Lambda; within containers running on EKS/ECS; and on on-premises servers. The CloudWatch agent reports on system-level metrics and logs.
Within CloudFix, the EC2 Low Risk Rightsizing finder/fixer depends on the CloudWatch agent to monitor memory usage in right-sized instances. This gives CloudFix the ability to quickly resize instances in response to high demand for memory in instances that were previously right-sized.
Back to keeping an eye on our resized instances. We suggest (and CloudFix uses) the CloudWatch approach. To watch the memory, use the following command to set a CloudWatch alarm:
aws cloudwatch put-metric-alarm \
    --alarm-name "HighMemoryUsageAlarm" \
    --alarm-description "Alarm when average memory usage exceeds 98% for 5 minutes" \
    --metric-name "mem_used_percent" \
    --namespace "YOUR_NAMESPACE" \
    --statistic "Average" \
    --period 300 \
    --threshold 98 \
    --comparison-operator "GreaterThanOrEqualToThreshold" \
    --evaluation-periods "1" \
    --alarm-actions "arn:aws:sns:REGION:ACCOUNT_ID:TOPIC_NAME" \
    --dimensions "Name=InstanceId,Value=YourInstanceId" \
    --unit "Percent"
You need to fill in the components in red with a CloudWatch namespace of your choice, an AWS region and account ID, and an SNS topic name. You also need a way of reacting to the CloudWatch alarm and rolling back the change. We suggest using a Lambda function that’s triggered by the CloudWatch HighMemoryUsageAlarm. This function will need to determine a larger instance size, stop the instance, change the instance type to a larger size, and restart the instance.
Word of caution:
If your EC2 instances are managed through an Infrastructure as Code (IaC) tool, like CloudFormation or Terraform, then modifying the instance type will lead to a “configuration drift” detection. This happens when the instance type and size specified in the code is no longer consistent with the running instance. You will want to put a mechanism in place for modifying your IaC files (e.g. your CloudFormation templates) to bring them up to date with the new instance size.
Right-size EC2 instances easily, continuously, and automatically with CloudFix
Alice had to drink potions and eat various (and questionable) snacks to change size. Lucky for you, right-sizing your EC2 instances doesn’t require consuming any magic ingredients – just clicking a few buttons.
With CloudFix, you can simply enable the EC2LowRiskRightsize fixer and allow our automated processes to do the work. But wait, you may ask. The process above isn’t that cumbersome. You just explained how to write our own automation for right-sizing EC2 instances. Why do we need CloudFix?
While you can write your own code to automate EC2 instance right-sizing, it’s not as easy as “set it and forget it.” There are a ton of little steps along the way that have to work with every use case, including edge cases like AWS running out of a certain instance size (we’ve seen this happen and built the solution into our code). Dealing with errors, fixing bugs, adding little “if” statements to your code every time something comes up – none of it is helping your business. It’s just a thorn in your side.
CloudFix has developed and tested this fixer on tens of thousands of accounts and accounted for all of the edge cases. This not only saves you time and ensures that the process can run continuously, it provides an insurance policy in a relatively high-stakes situation. When you’re stopping EC2 instances, you need to be confident that they will start again. In other words, while the process may seem simple, it’s critical that it’s reliable. That’s where CloudFix comes in.
Between our cautious criteria for resizing and our CloudWatch-based monitoring and rollback mechanisms, CloudFix is the proven, continuous, and automatic way to ensure that your EC2 instances are right-sized. With CloudFix, like Tolkien’s ring, your EC2 instances will always fit their rightful bearer.