Reduce AWS CloudTrail costs by de-duplicating trails


I could go back in the direction I had come from, or I could go forward in the direction I intended to go.
– Cheryl Strayed, Wild: From Lost to Found on the Pacific Crest Trail
In the 2014 movie Wild (and the book that inspired it), Reese Witherspoon’s character hikes the Pacific Crest Trail (PCT) in search of deeper meaning and personal growth. In the opening scene of the film, she throws her boots off of a mountainside in frustration because they weren’t sized appropriately and weren’t worth the added weight. (Fun story: the movie crew never found the boot, but a hiker did a few months later.)

I can relate to this moment on a couple of levels. I grew up in the Pacific Northwest and have hiked parts of the PCT; I can attest that this trail is just as stunning as it looks. I also understand the impulse, on the trail or otherwise, to get rid of things that are weighing you down… which brings us to today’s topic.
Like poorly-fitting boots, duplicate trails in AWS CloudTrail just aren’t worth keeping around. While we can’t exactly chuck redundant trails off a cliff, we can get rid of them (manually or easily and automatically) – and achieve significant AWS cost savings in the process.
Table of Contents
- AWS CloudTrail: What it does, how it works, and why we use it
- Why do we end up with duplicate AWS CloudTrail trails?
- How much can you save by deactivating redundant AWS CloudTrail trails?
- A five-step process for manually deactivating redundant AWS CloudTrail trails
- Automatically deactivate duplicate CloudTrail trails with CloudFix
- Appendix: Comparing CloudTrail properties
AWS CloudTrail: What it does, how it works, and why we use it
Before we dig in, let’s quickly review the basics. AWS CloudTrail is a service for monitoring and recording AWS API calls across the vast majority of AWS services, including EC2, VPC, S3, IAM, EBS, CloudFront, SQS and more. We use it to understand and audit the actions taken across AWS accounts. We also rely on CloudTrail for compliance purposes, to record logs for industry-specific or internal IT standards.
Within CloudTrail, there are several event types, including data events, management events, and Insights events. In this blog, we’ll focus on management events, which broadly concern the creation, usage, and deletion of AWS resources. Creating an S3 bucket, for example, would be a management event.
You can aggregate and organize the events that CloudTrail monitors by creating trails. (These trails, unfortunately, aren’t quite as lovely as the PCT. Far fewer conifers.) According to AWS, “a trail is a configuration that enables delivery of events to an Amazon S3 bucket that you specify. You can create a CloudTrail trail to archive, analyze, and respond to changes in your AWS resources.” For instance, a trail that records network configuration changes can help make sure that your network is functioning as intended, or a trail that monitors the creation of S3 buckets can ensure that proper encryption policies are in place, which is particularly important to HIPAA, PCI DSS, and GDPR.
In other words, trails allow teams to easily monitor a set of events within a pre-defined group of AWS services, all in one place and with useful metadata such as the event source, source IP address, and user identity. They’re incredibly useful for providing an audit trail of exactly what is happening in an AWS account, but they can also drive up costs if you’re not careful how you use them.
Why do we end up with duplicate AWS CloudTrail trails?
AWS CloudTrail can support multiple trails, including multiple trails that monitor some of the same events. This flexibility can be a good thing. It also makes it easy to create and pay for trails that end up being redundant. This is how cost overruns occur, and why we’re digging into this topic in the first place.
Say one IT administrator is interested strictly in S3 and EC2 usage, while another is tasked with complying with a particular standard, like HIPAA. They both create trails to meet their specific needs, but in the process, they may capture overlapping events.
This situation typically happens naturally due to lack of communication. Everyone’s working in their own siloes, doing their own thing, and no one thinks about the fact that other people may be monitoring the same events. It’s especially pronounced in large organizations, where disparate teams create CloudTrail trails to monitor their specific resources and events. The result: redundant trails, duplication of effort, and most importantly, increased costs that tend to go under the radar.
There’s another scenario in which IT teams acknowledge the overlap between trails, but do it anyway. Why? The argument is that having logically differentiated trails, like one trail for HIPAA and another for S3+EC2, makes it easier to review and comply with regulatory requirements. The logs live in their own easily accessible buckets, and the reduced complexity is worth the extra cost.
Is it worth it? We vote no. The primary purpose of CloudTrail logs is simply existing in case of an audit. Events are recorded in S3, so the owner of the AWS account is compliant. The end. For audit purposes, just proving that the data exists is enough. If the data really needs to be queried for some reason, we can use tools like Athena, ElasticSearch/Logstash/Kibana (the ELK Stack), DataDog, or Splunk. These tools are filtering data anyway, so separating some out for a particular audit isn’t an issue.
Useful aside: What to do instead of creating unique CloudTrail trails for each use case
Instead of creating a variety of logically differentiated trails, we recommend having one large trail. The “master trail” records all of the events you need to meet all of your requirements, which you can filter after the fact if necessary. By using the same trail as a data source for multiple dashboards and reports, you can really optimize your CloudTrail spend. Combine this with AWS’s free storage of the first copy of a management event, this approach can eliminate a large portion of your CloudTrail costs. Cheers to greater AWS cost savings.
In any event: whether you end up with duplicate CloudTrail trails because of a lack of communication or deliberate strategy, you’re paying way too much for them. CloudTrail records the events associated with a trail into corresponding log files in S3, and charges based on the number of recorded events in a trail. So, back to our example above, if IT admin #1 and IT admin #2 are recording the exact same set of events for different reasons, you’re paying for it twice – and overpaying for AWS is not how we roll.
How much can you save by deactivating redundant AWS CloudTrail trails?
Just how much does it cost to support redundant versions of CloudTrail trails?
CloudTrail management events (the ones we’re interested in) cost $2.00 per 100,000 events delivered. At first glance, this seems trivial. But, loyal readers, we’ve been here before! Just like many other AWS resources (looking at you, elastic load balancers and elastic IP addresses), the cost can scale endlessly, and endlessly scaling costs are never a good thing. Also, as mentioned above in our Useful Aside, the first copy of a management event is stored for free. If we’re clever about only storing one copy of an event, we can substantially reduce our costs.
Some of the most common CloudTrail management events are:
- EC2:
RunInstances, StartInstances, StopInstances, TerminateInstances - Lambda:
CreateFunction, UpdateFunctionCode, DeleteFunction - RDS:
ModifyDBInstance, CreateDBSnapshot - SQS:
CreateQueue, DeleteQueue - CloudFormation:
CreateStack, UpdateStack, ValidateTemplate - S3:
CreateBucket
These operations occur frequently in the course of managing a large AWS deployment and add up fast. In fact, one of our large customers had nearly $90K in annual CloudTrail management event spend. Of that, it turned out that a full $74K – 82% – was redundant and could be eliminated. While the numbers will change with every company, it’s clear that there are savings to be found here.
CloudTrail event costs are a large and complex topic. Read on to get deeper into the nitty gritty, then check out
this AWS Knowledge Center article. It provides additional details and recommendations about the cost of duplicate management events and the types of events that can drive up costs.
A five-step process for manually deactivating redundant AWS CloudTrail trails
We know why it’s worth going after duplicate CloudTrail trails: they’re costly and unnecessary. Actually deactivating them, however, isn’t quite as simple.
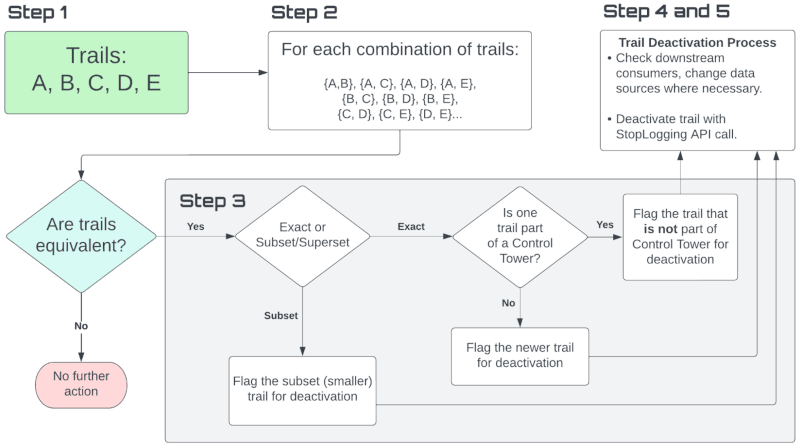
Manually identifying which trails are redundant, determining which ones to deactivate, and then actually switching them off requires five steps:
- List all the trails
- Compare each pair of trails
- For overlapping pairs, select a trail to deactivate
- For each trail marked for deactivation, check for downstream consumers and take any appropriate actions
- Deactivate the trail
A five-step process for manually deactivating redundant AWS CloudTrail trails
Step 1: List all the trails
The process starts out easy. We can use the ListTrails API call to – wait for it – list the trails. From the command line, use the AWS CLI to launch this command:
aws cloudtrail list-trailsAWS CloudTrails are associated with each region, so you need to run every step in this process for every region. You can get a list of regions with this command:
aws ec2 describe-regions --query 'Regions[].RegionName' --output textPro tip: for this process, we recommend using Python rather than a shell script. There are some complicated bits coming up with comparing trails, and you want to have the flexibility of a proper programming language at your fingertips. Here’s how to list the trails in Python:
import boto3

def list_trails_in_region(region_name):
    # Create a CloudTrail client for the specified region
    client = boto3.client('cloudtrail', region_name=region_name)

    # Call the list_trails method
    response = client.list_trails()

    # Extract the trail list from the response
    trails = response['Trails']

    return trails
Step 2: Compare pairs of trails
This is why we wanted to use a proper programming language. Say we have trails A, B, C, D, and E. We need to list and compare every possible pair of trails. For this set, it would be {A,B}, {A, C}, {A, D}, {A, E}, {B, C}, {B, D}, {B, E}, {C, D}, {C, E}, and {D, E} – 10 different comparisons.
Here is the Python code for creating a list of pairs of all trails:
# Given a list of trails, return a list of every possible combination of trails
def makeTrailCombinations(trails: List[Trail]) -> List[Tuple[Trail, Trail]]:
    trail_combinations = []
    for i, trail1 in enumerate(trails):
        for trail2 in trails[i + 1:]:
            trail_combinations.append((trail1, trail2))
    return trail_combinations
✏️ Math moment! ✏️
The number of possible combinations grows fast! If you’re into card games (or somehow remember high school math), you may have come across this formula:
$$\binom {n}{k} ={\frac {n!}{k!(n-k)!}}.$$
It is the number of unique subsets of size k, out of a group of size n. If you are interested in the number of possible 5-card hands from a deck of cards, n=52 and k=5. For CloudTrail trails, n is the number of trails we have in a region, and k is 2, since we are comparing pairs of trails.
Once we have our list of pairs, we need to compare them against each other. First, get the events and properties associated with each trail with the API functions DescribeTrails, GetTrailStatus, GetEventSelectors, and GetInsightSelectors. Using these functions in your code allows you to get all of the information necessary to make the comparison.
When you have the sets of events and properties for each trail, you need to run a compareTrails function on each pair of trails.
The compareTrails function is where the heavy lifting happens. For a given pair of trails, it compares the set of events monitored and set of properties to determine if the two trails are capturing the same data.
The “outer loop” of your code will then look like:
# Get list of pairs of trails
my_pairs = makeTrailCombinations(my_trails)

# Iterate over list of pairs, compare each one
for (trail_a, trail_b) in my_pairs:
    result = compareTrails(trail_a, trail_b)
   # Based on result, take action….
When we compare a set of trails against each other, there are a few different scenarios that can occur. Of course, if they have nothing in common with each other, they’re not redundant and we keep them both. But if they do overlap, it can happen in three different ways:
- Trail X and Trail Y partially overlap
- Trail X and Trail Y are equivalent – exactly the same
- One trail is a subset of the other
Scenario 1: Trail X and Trail Y partially overlap
With a partial overlap, the trails are monitoring some of the same events, but some events are unique to each trail. This means that we can’t deactivate either one without possible downstream effects. Ideally, if you follow the Useful Aside above and just have one trail that accounts for every requirement, you won’t run into this issue, but for now, we keep them both. Visually, it would look like:
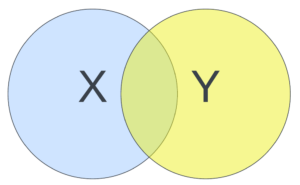
Who doesn’t love a good old Venn diagram? You can thank us later.
So: partial overlap, no opportunity to deactivate duplicate trails. Scenarios 2 and 3, however, are where we can find our redundancies – and cut our costs.
Scenario 2: Trail X and Trail Y are equivalent

This means that they are monitoring the exact same set of events and have compatible properties. Lots of potential for duplication here, which means potential for savings!
Scenario 3: One trail is a subset of the other
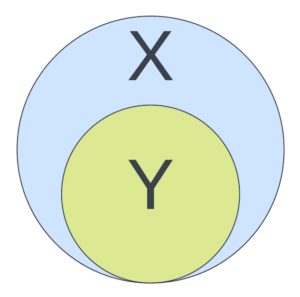
This is our most complex scenario. For trail X to be a true superset of trail Y, it has to have an equal or larger scope in every respect, including the set of properties (check out the chart in the appendix for more detail). The potential for de-duplication here comes from the chance to get rid of the subset (smaller set).
Let’s look at a concrete example. Say we have a CloudTrail trail set up to monitor the CreateBucket and DeleteBucket management events.
Now, say your colleague down the (probably virtual) hall wanted to create a trail that monitored all management events, using the wildcard selector:
ManagementEvents:
  - '*'
Your colleague’s trail would capture the CreateBucket and DeleteBucket events just like your original trail, but would capture lots of other events as well. This new trail would be a superset of the old trail, so you would end up double paying for the CreateBucket and DeleteBucket events.
Step 3: Select a trail to deactivate
Once we’ve identified a pair of trails where one is redundant, we can reference our handy-dandy flow chart to choose which one to deactivate.
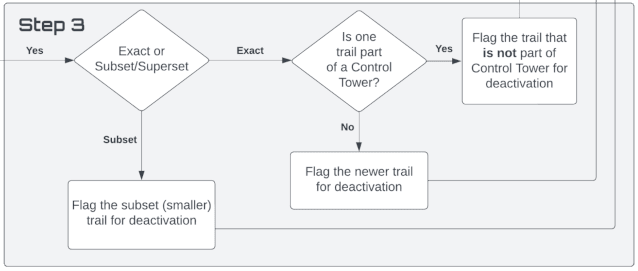
For my non-visual learners, here’s the decision-making framework:
- If the two trails are an exact match (scenario 2 above), first determine if either of the trails is part of a Control Tower. (A Control Tower is a framework for monitoring multi-account AWS environments. If a trail is part of a Control Tower, we know that it’s higher up the food chain and something depends on it.)
- Is one of the trails part of a Control Tower? Flag the other (non-Control Tower) trail for deactivation.
- Neither of the trails are part of a Control Tower? Flag the newer trail for deactivation.
- If the two trails are a superset or subset of each other (scenario 3 above), flag the subset (smaller) trail for deactivation. This ensures that we won’t lose any data.
Step 4: Check on downstream consumers
There is one more wrinkle. When you eliminate a trail, even if the trails are redundant in the sense of the events that they are monitoring, they may have different downstream consumers, like dashboards.
Before you deactivate a trail, you need to make sure that the downstream consumers of the trail won’t be affected. In the case of a dashboard, this would require pointing the dashboard at a new source and modifying the selection/filter criterion to ensure that the incoming data remains the same. It’s important to implement and test this before you deactivate the trail.
Here’s what this looks like in action:
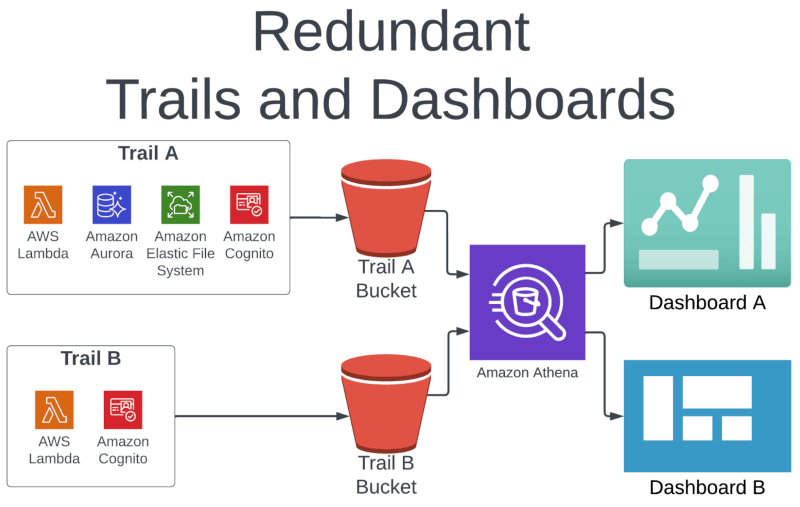
In the example above, Trail A is recording events for Lambda, Aurora, EFS, and Cognito. Trail B is recording data for just Lambda and Cognito. In this case, Trail A is a superset of Trail B.
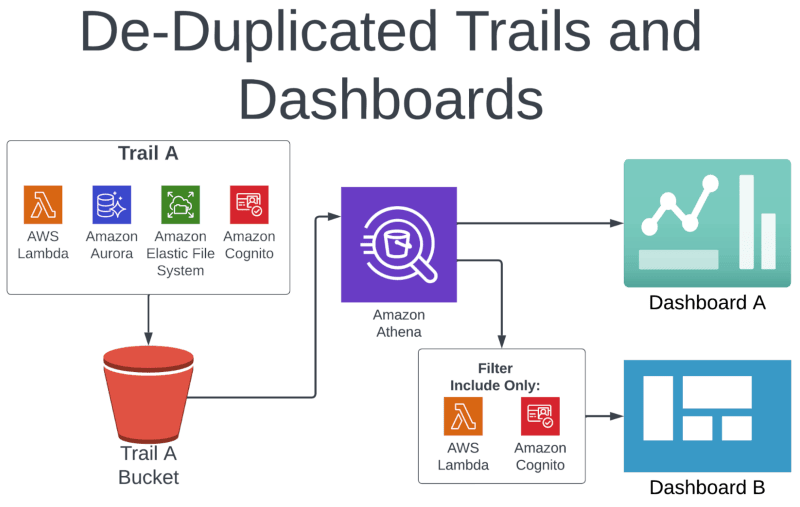
We can deactivate Trail B, since it’s redundant with Trail A; Trail A actually has more data than what is required for Dashboard B. Notice that we are using Amazon Athena to power both dashboards.
Since we are already using Athena, we can simply modify the query that powers Dashboard B to exclude the unnecessary data.
There are a variety of tools to process and visualize data in this way. We’re partial to AWS native tooling like Athena and QuickSight, but if you’re a Splunk or Tableau shop, for instance, use what you’re comfortable with. The key takeaway is that there may be some modification required to the downstream consumers of the deactivated trail, and you’ll need some tool to read the raw CloudTrail data from S3 and filter out unneeded events.
Step 5: Deactivate the trail
To quote the inimitable Inigo Montoya, “let me sum up.” You have listed all trails in a region, compared all the pairs of trails, identified redundant trails, checked for downstream users of the data, and made any necessary changes to ensure that all dashboards continue to operate. Give yourself a pat on the back.
Let’s finish the process like we started it: with a simple step. When all the steps above are complete, deactivate the trail with the StopLogging command. We like StopLogging better than DeleteTrail, because it can be reversed if you decide that you want to reactivate one of the trails. The syntax is:
aws cloudtrail stop-logging --name <trail-name>Automatically deactivate duplicate CloudTrail trails with CloudFix
CloudFix, of course, makes that very arduous process much, much easier.
With CloudFix, de-duplicating CloudTrail trails is almost completely automated. Notice we said “almost”; this is one of the rare occasions where it’s not strictly as simple as enabling the fixer, reviewing and approving the changes, and enjoying the savings. You still have to run step 4 yourself to check on downstream consumers. CloudFix, however, takes care of the rest.
Once your downstream consumers are squared away, just approve the savings opportunities CloudFix has identified. CloudFix will generate the change template and once you approve the changes, it will take care of deactivating the correct trail. The result: you remain in compliance without paying for the same event twice. That’s more money and time in your pocket – time enough, perhaps, to enjoy some real trails.
Appendix: Comparing CloudTrail properties
This table contains a list of CloudTrail trail properties, and how to compare trails.
|
# |
PROPERTY |
CONDITION |
|
1 |
|
Both trails have the same configuration, or the superset trail has this set to “True,” while the subset trail has this set to “False.” |
|
2 |
|
Both trails have the same configuration, or the superset trail has this set to “True,” while the subset trail has this set to “False.” |
|
3 |
|
Both trails have the same configuration, or the superset trail has an “All” configuration, while the subset trail has a “ReadOnly” or “WriteOnly” configuration. |
|
4 |
|
Both trails have the same configuration, or the superset trail excludes a subset of the events in the subset trail. |
|
5 |
|
Both trails have the same configuration, or the superset trail tracks all the data sources of the subset trail. |
|
6 |
|
Both trails have the same configuration, or the superset trail has this set to “True,” while the subset trail has this set to “False.” |
|
7 |
|
Both trails have the same configuration, or the superset trail contains all the types included in the subset trail. |
|
8 |
|
Both trails have the same configuration, or the superset trail has this set to “True,” while the subset trail has this set to “False.” |
|
9 |
|
Both trails have the same configuration, or the superset trail has this set to “False,” while the subset trail has this set to “True.” |
|
10 |
|
Both trails have the same configuration, or the superset trail has an “empty” list, while the subset trail has a non “empty” list. |
|
11 |
|
Both trails have the same configuration, or the superset trail has an “empty” list, while the subset trail has a non “empty” list. |